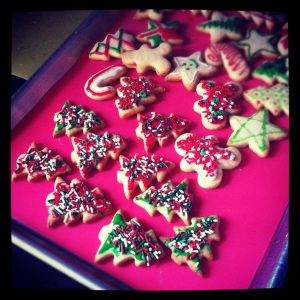
Last year in an attempt to steer my all-adult family away from so much gift shopping, I gave cookies last year. Fake Voracek and I had a blast decorating them, and as a bonus got to sneak vulgar cookies into a family tradition. Ah, bliss.

ohhh myyyyyy.

Gingerdead man!
This year I’ve added to our recipe arsenal with the Vanilla Icebox Cookie recipe and its variants from America’s Test Kitchen. You’ll have to log into the website but it’s free and the recipes are worth it. I promise. I made the butterscotch and chocolate variants and these might be the best cookies ever.

makes a lot!

A. B. C.
They were fast (as long as you’ve got other things to do while they’re chilling, which needs to be done in several increments) and amazing. The website encourages you to make either the top checkerboard configuration, or the classic pinwheel variant. I’ve got other things to do than repeatedly reroll and shape dough, though, so I did one set of checkerboards (A).
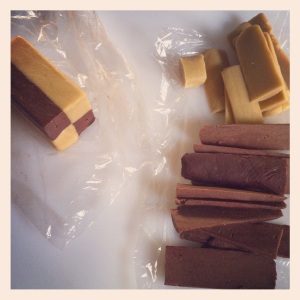
Then I took the trimmed pieces, sandwiched one of each flavor between plastic wrap, and squished with the flat edge of my chef’s knife (could probably also use rolling pin). I did this a bunch of times and stacked them until they formed a rough square before trimming them into an actual square. This yielded cute striped cookies (B).
Then I took the trimmings once more and kinda smashed them all together into a round log, which gave the marble style (C).
Each was equally delicious, and therefore I was rewarded for my laziness creativity.
Pro Tips:
- If you keep your house under 60 degrees, roll-out dough stays workable longer. You know, if your frozen fingers can work it.
- If you keep your house under 60 degrees, your cats will develop bad habits and make poor choices at naptime.
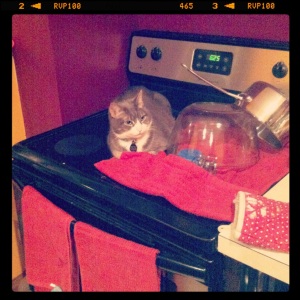
Unhelpful Cat is Unhelpful!
- If you keep your house under 60 degrees, you probably won’t lose interest midway through cookies because everywhere away from the oven is freezing.
- Got a food dehydrator? Good news! You’ve got a cookie cooling rack too! Also good for cooling: Thin plastic cutting mats, clean screens.
- After you cut out your cutouts and arrange them on your baking sheet, throw them in the fridge for a few minutes. Or keep your house at 55 and don’t worry about it.
- Sprinkles before baking, but icing once cookies are cool, unless you’re into that melty-runny look.
- Sparkly gel icing doesn’t ever really dry. Consider using it to adhere colored sugars, or give it a light dusting with powdered sugar so it won’t stick to all your other cookies and ruin them.
- Give baking sheets a quick wipedown with a paper towel between batches, to prevent crumbs and gunk from building up.
- Use tools. Plastic wrap, wax paper, parchment paper, flour, rolling pins. They’re here to help, and each can make dough infinitely more manageable. Also, pictured above you’ll see a nonstick rolling pin. This is not appreciably better than a well-floured wooden one. Just FYI.
- Tiny corners in your cutouts keeping your cookie in the cutter? Use the butt-end of a chopstick to gently push it loose.
- Don’t wear nail polish while kneading dough by hand. You’re welcome.
- Fake a pastry icing bag by scotch-taping a corner of a sandwich bag and cutting a small bit of the corner off. The tape will keep the bag’s seam from splitting further from the pressure, and if you don’t use all your icing you can tape it shut and throw it in the fridge, or trash it when you’re finished.
Best of luck, and remember, you get to eat all the ugly ones!